Re-doing my Homelab with NixOS
05 Apr 2026
It's been a little more than 2 years since my earlier homelab post (here). I moved onto a shiny 8GB Raspberry Pi 5 shortly afterwards (from an RPi4) and worked on a few things. This post is a continuity to how things have evolved in terms of my requirements and the solutions I now see as a better fit.
The most interesting change for me has been migrating most of my machines to NixOS.
 Wall mounted (^>⩊<^)⟆
Migrating from Raspberry Pi OS
When I first started self-hosting, I had been managing services mostly manually: installing packages directly on the system, editing config files scattered across /etc/.
NixOS seems to help with this by defining all such nitty-gritties into system configuration files. This means I can completely recreate my self-hosting setup on a fresh RPi just by "copying" over my configuration files (in quotes because there's been more to just copying as I continue to dig more into the ecosystem; discovering nixos-anywhere and many more interesting tools).
I've slowly migrated most of my machines to run NixOS, including my RPi5 role-playing as homelab. Diving into NixOS has been one of the few significant investments that I'm really happy about. Beyond the reproducibility benefits, it's helped me gain a different perspective to how I think about system complexity.
My NixOS configuration as of writing this post can be found here. All the stuff I talk about below are implemented in this config.
Ideas behind self-hosting
I got into self-hosting mostly because it seemed fun and tinkerable. However, with time it's become pretty important to me, more so to resist stashing away more of my digital identity within walled gardens.
I try to approach hosting services for personal use with a long-term perspective whenever feasible. I've got services like Immich (photo management) and paperless-ngx (document organization) that I've spent time on carefully curating them. They hold important paperwork and memories of loved ones. Lately I've been trying to approach preserving them in a way I hope will outlive me, at least for a while. Maybe loved ones who care enough would be able to get LLMs to help them extract whatever's left of it.
I mainly run a few scheduled jobs and otherwise host services that tend to run idle most of the time, so a low-powered and power-efficient machine like RPis seem attractive to my use-cases. In the cases I could use more power (such as local LLM inference or Sunshine game streaming), I'm okay with offloading processing to a beefier machine (that isn't up 24/7) and a little bit of wait as it boots up and gets to crunching.
For when I bork up my installation
I like how I can generate a complete system image from my configuration. Here's what needs to be done in my case to get back to the original system state afresh:
System image
I generate an image file of my entire configuration which I then dd/cat/pv to a microSD card. It'll boot up on my Pi with all my
favorite packages pre-installed and my environment exactly as defined. However, since I use sops-nix to
store encrypted secrets directly in my config, there are a few additional steps I have to perform to get my homelab-specific private SSH key in place (this key allows sops-nix to decrypt secrets like my Headscale auth keys, etc.).
The process looks like this to be precise:
-
Build the system image (preferably using an ARM64 machine for native compilation):
$ cd /etc/nixos $ nix build .#pilab-sd -
Write the image to microSD:
$ pv ./result/sd-image/*.img.zst | unzstd | sudo tee /dev/sdc > /dev/null -
Plug the microSD into my Pi and power it up.
-
Wait 3-4 minutes for the Pi to set up its directory structure, then power off and mount the microSD on another machine to place my private SSH key into Pi's
/etc/ssh/ssh_host_ed25519_key.(I wonder if it's possible to automate this step by inserting in a Yubikey at boot)
-
Plug the microSD back into the Pi and boot it up.
That's it! I can now SSH into my Pi and be greeted with my complete environment. I then start my services manually with sudo homelab-start,
since I get prompted for my LUKS decryption key at this step which I like feeding in manually, as I've defined in my flake config.
At this point, I'm pretty much back to how everything needs to be.
Software updates
One challenge I faced early on was keeping my NixOS system updated. I initially started with NixOS stable channels, but quickly realized my favorite new features in tools like Hyprland (a tiling window manager) sometimes take a while to hit stable channels. I also had issues with screen-sharing.
I moved to unstable channels, but had a similar feeling of being a bit behind. Eventually, I decided to track nixpkgs master branch directly to get everything as close to latest. This might not be feasible for everyone since software builds tend to break on master branch at times and nixpkgs cache doesn't track the master branch for build artifacts. I've spent quite a bit of time and electricity on updates trying to compile everything locally on my machine when tracking the master branch.
It's gotten better over time however, after figuring out my pain points. Mainly:
- Don't start a system update if packages will break halfway through.
- Avoid compiling everything on my local machines (since NixOS builds up official cache only once the packages reach unstable channels).
Automating software updates using GitHub actions
Here's what I do now and it seems to help with the pain points noted above.
I have GitHub actions create a pull request to my dotfiles repository every day with the most current up-to-date package versions in my flake.lock. For every such update, GitHub actions attempts to build packages for all my machines and pushes the resulting build cache to my RPi5.
My RPi5 hosts a public attic server (a self-hosted binary cache for Nix packages). It's read-only by default
but I store write keys into my repository secrets so GitHub actions has push-access to my cache.
The PR gets a green checkmark iff all the packages build successfully for all my machines. This means the update will go through successfully everywhere since I share my flake.lock between my machines.
For an example, check out PRs on my dotfiles repo (such as this one).
I can then accept updates by merging PRs with green passing checks. After merging, I manually run git pull and sudo nixos-rebuild switch --flake .#my-machine on each machine. The build cache gets pulled from my RPi5's attic server, so updates are fast.
If there's a runtime bug in a package, I find myself going ahead with one of these two options usually:
- Rollback to the previous NixOS generation and wait for the bug to be fixed upstream.
- Revert just the problematic package by pinning it to an older nixpkgs version.
This whole thing helps me with getting access to newest packages and versions with somewhat confidence that they'll work fine.
Re-doing my backups with Restic
I moved from Kopia to Restic for backups because a single Kopia instance doesn't support backing up to multiple repositories, and I didn't want to maintain multiple Kopia instances. NixOS also has a native Restic module that gives fine control over backup schedules, snapshot pruning, compression levels, and more.
Restic seems to work nice
My Restic backup server and clients run on different machines, but they stay compatible because my machines use the same flake.lock file. All my machines run the same Restic version (server version stays in sync with client version), so I don't have to worry about client-server version mismatches.
Restic NixOS module lets me read repository credentials through sops-nix so I'm able to store these creds into my flake config itself declaratively.
The module also offers backupPrepareCommand and backupCleanupCommand options which help me light up an LED on my Pimoroni Explorer HAT Pro when the snapshot backup is in progress (just some nice visual indicators I enjoy seeing) and lets me send success/failure notifications to my self-hosted Uptime Kuma monitoring server (also running on the RPi5) after a snapshot is done.
Since I store all my self-hosted stuff on a BTRFS filesystem, I take a BTRFS snapshot to freeze the filesystem state and then I backup this BTRFS snapshot through Restic. This helps with backing up my SQLite3 and PostgreSQL databases correctly which otherwise may end up in a corrupted state due to race issues if I were to run backups on a live filesystem (these databases use WAL to store state which might get flushed during the database backup leading to inconsistency).
Check out my restic.nix to see all this in practice here.
Lazy-loading services to save memory
At the time of writing this, I have curated over 50 independent Docker compose stacks (resulting in 75+ Docker containers) as seen here. This is too much for my RPi5 8GB RAM variant to run all at once, even with zram compression. I've ruminated on getting better hardware, but it looks like it's possible to lazy-load non-essential services on-demand (only when someone actually tries to access them) which saves memory usage when such non-essential services aren't being used.
Services like Navidrome (music streaming), TubeArchivist (YouTube archival), and Memos (note-taking) don't need to run 24/7. I'm okay waiting a few seconds for these to start up when I want to use them.
Socat to lazy-load
Here's what I've been able to come up with to achieve lazy-loading:
- Port monitoring: socat listens for connections on the service's normal port.
- Service startup: When a connection is detected, the actual service launches on an internal port .
- Proxy mode: socat forwards requests to the now-running service.
- Automatic shutdown: A monitor checks for active connections every ~10 minutes. If there are none, the service stops and socat resumes listening.
For example, see this implemented for Navidrome here using a custom module for implementation here.
I've extended this pattern to several other services like Mealie (recipe management) and HomeBox (inventory tracking).
The user experience is alrightish. These services usually start fast enough. Anyway, I'm still on a memory crunch since at times kernel starts page swapping pretty aggressively which ends up eating up all my CPU for quite a while.
I later also discovered sablier which does something similar. I haven't been able to dig in deeper to compare it with my approach.
Exposing services to friends
Sometimes I need to share a service running on my RPi5 with friends or family who aren't part of my Headscale network. For these cases, I run a reverse proxy using Nginx on my personal VPS, which routes requests through my RPi5 over my Headscale connection.
The VPS also runs NixOS. I can hand out a subdomain to friends, and they can access my service without needing special software or VPN access. More details about my VPS setup and how I use nixos-anywhere to install NixOS on providers that don't officially support it are here (Vultr and HostVDS for now).
Future plans: Wi-Fi router functionality
This is still an idea needing research, but I'm considering running a wireless access point from my RPi5. The goal would be to route all connected devices through a VPN automatically, avoiding the need to configure VPN on each device individually. I'd also like to explore OpenWRT-style features like VLANs for isolating sketchy IoT devices.
This appeals to me because I have a basic router and would rather avoid buying new hardware if I can integrate something like this into my RPi5 itself. It's currently connected to the Internet via an Ethernet cable anyway, so an access point with this setup shouldn't be so bad I guess. NixOS on top should help me keep router-specific configuration manageable. I might do a post if this ever happens.
Power consumption
My current setup includes three NVMe drives connected to my RPi5 and a few other peripherals as listed:
- Two NVMe drives using Seeed Studio's PCIe3.0 Switch to dual M.2 hat (one for primary data storage, the other for OS and attic cache).
- A third NVMe in a USB enclosure via USB 3.0 (for on-site backups).
- Official RPi5 active cooler.
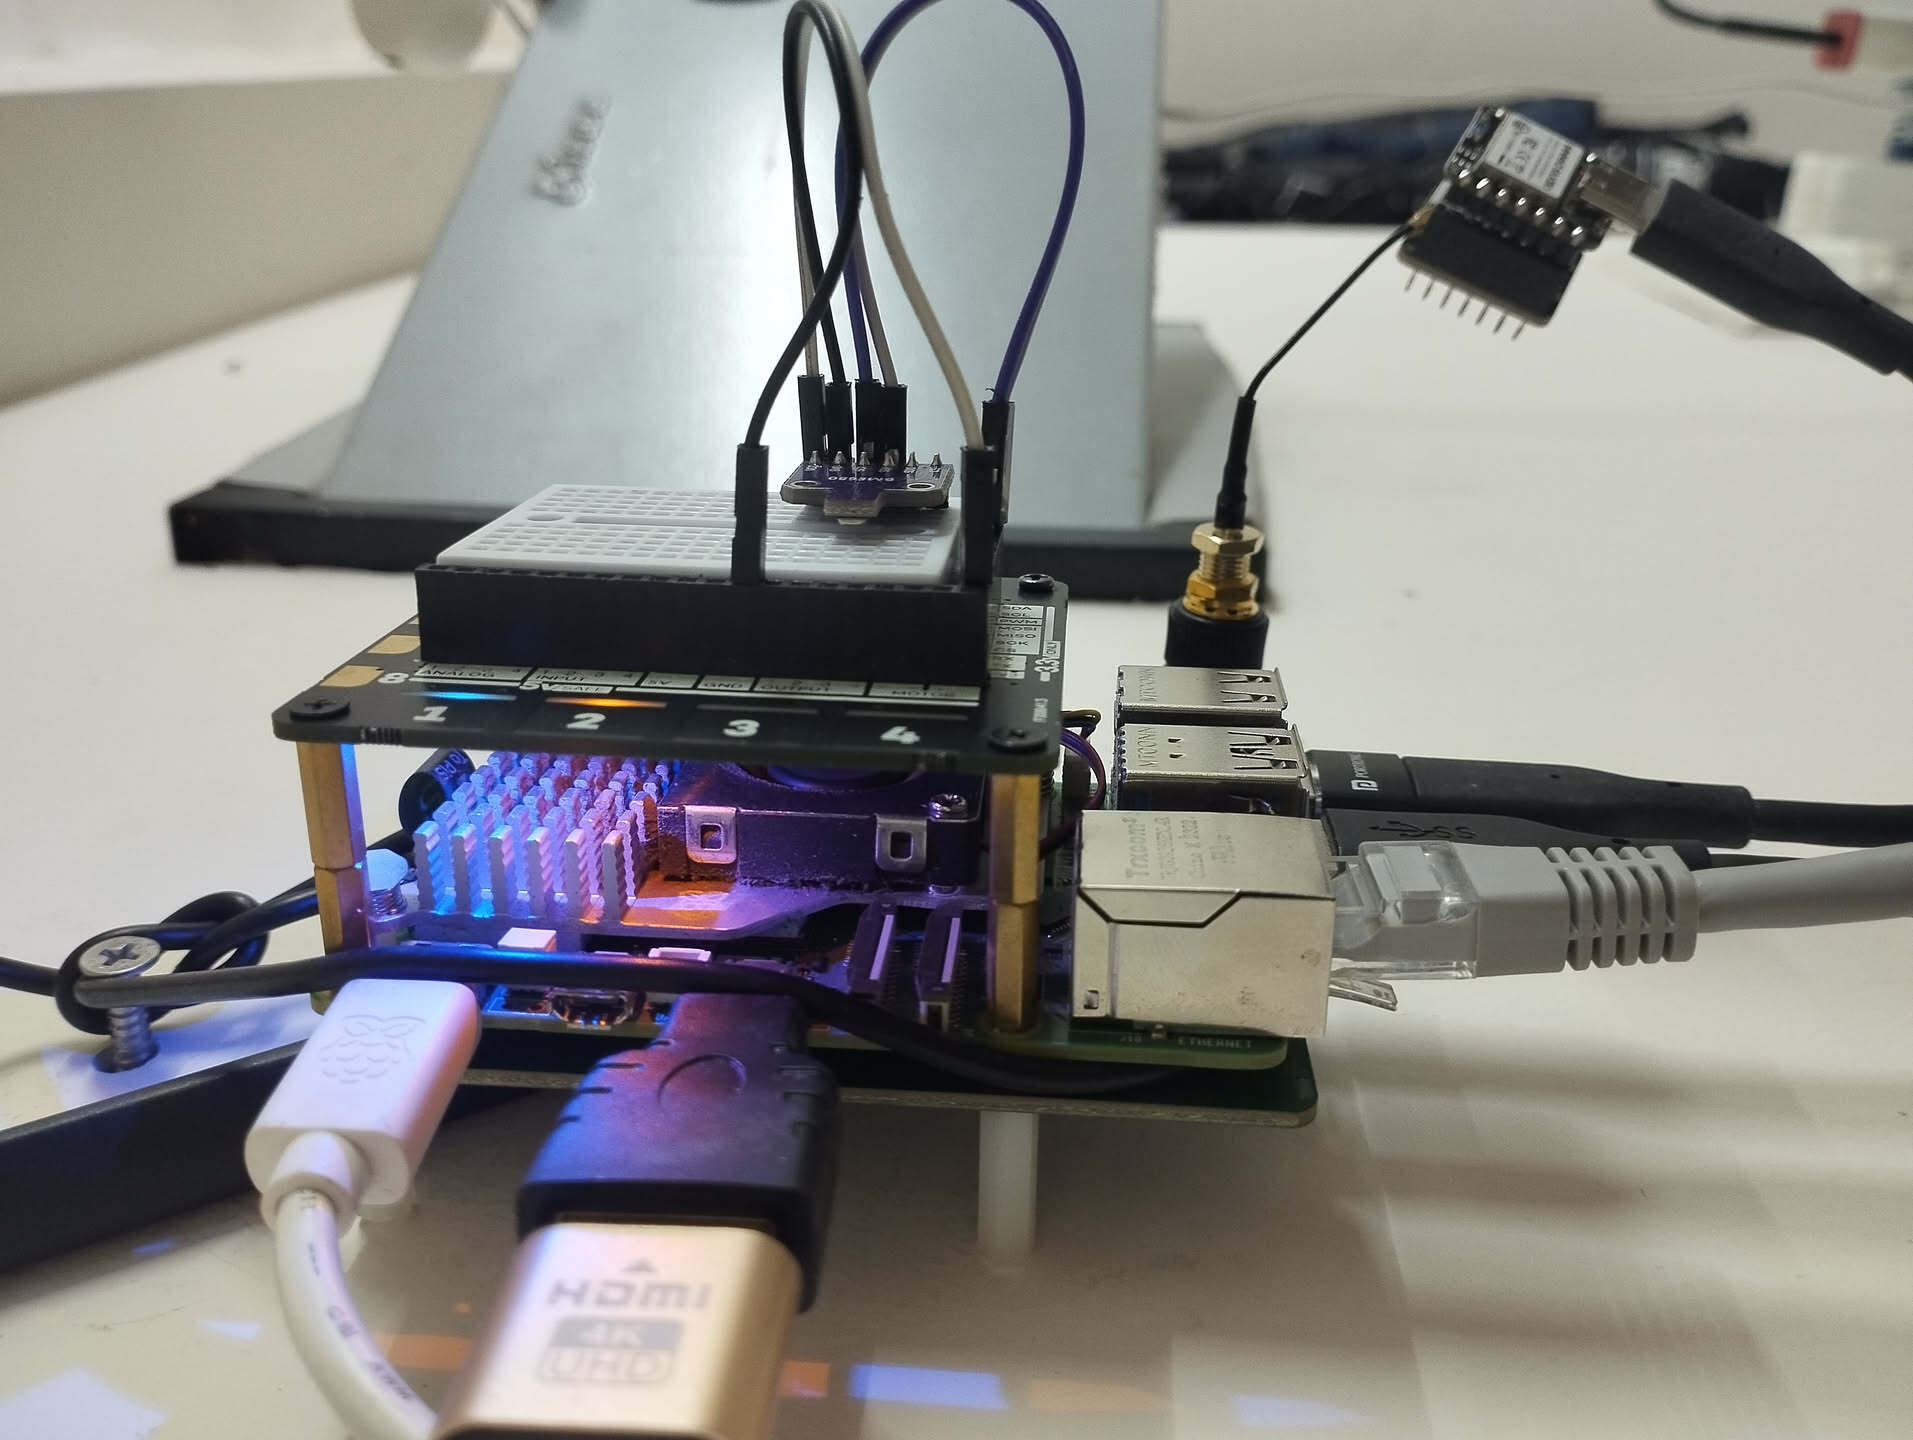
- Pimoroni Explorer HAT Pro connected through GPIO pins. Has LEDs and a mini 170-point breadboard that I've wired up with a BME680 sensor to collect environmental readings.
- NRF52840 with a SX1262 transceiver and a dedicated LoRa antenna connected to USB 2.0 for running a Meshtastic node.
- Occasionally a USB 2.0 Wi-Fi dongle (for experimental Wi-Fi router functionality).
- A dummy HDMI adapter cause why not.
This entire setup consumes about 9-10W at idle and peaks around 16-19W under heavy CPU load and disk-usage, as measured using my locality's Kill-A-Watt equivalent.